20211105

Using the Latest Linux Kernel in Ubuntu

Use Mainline to install the latest kernels

apt install mainline

mainline/focal,now 1.0.15-0~202110201909~ubuntu20.04.1 amd64 [installed]

  Kernel Update Utility for Ubuntu-based distributions


Create an alias to download and install the latest linux-firmware.

 alias updatemodules = 'rm -rm ~/Downloads/linux-firmware || cd ~/Downloads && git clone https://kernel.googlesource.com/pub/scm/linux/kernel/git/firmware/linux-firmware.git && sudo cp ~/Downloads/linux-firmware/amdgpu/* /lib/firmware/amdgpu && sudo update-initramfs -k all -u -v'


From there you can use the latest kernel with the latest firmware installed.


Enjoy.


20210901

Note On Lenovo Ideapad 14

 Running Ubuntu on the Lenovo Ideapad 14 (AMD) has been solid over the past year. There are a few issues I have and somethings that just won't work for a more long term solution.

1) Lenovo Ideapad does not support display over USB C port, only power delivery.

2) Ubuntu kernels are old and have outdated support for the touchscreen and other features.


To solve the first issue, a second cable connected to the HDMI port solves that quickly. It would be nice to use 1 USB C connection for the Power, HDMI output, and data transfers. I wonder if the new version using 5500 CPUs addresses the lack of hdmi over USB C.


Solution for the second issue is simple. Install Mainline.

sudo apt install mainline
Once installed you can change the kernels installed and purge which you don't need. Great way to test the kernel support for all the hardware on the laptop.

20200823

[KITS] Rancher and FreeNas NFS HowTo

Keeping It Totally Simple: Deploy Heimdall 

Summary: Deploy a kubernetes cluster using docker as the container engine and FreeNas for the persistent storage service. Deploy heimdall workload and keep all your important links in one place. Enjoy!

  1. Deploy Ubuntu Server as Host
  2. Deploy FreeNas Server ( skip if you don't want to use NFS)
  3. Install Rancher on Ubuntu
  4. Enable ZFS Pool and create a Generic dataset
  5. Set the user and group as the same user on the Ubuntu server
  6. Create Rancher cluster and deploy nodes for etcd, controlplane, and worker
  7. Setup Persistent Storage to NFSv4 share
  8. Deploy heimdall and bind persistent storage to use as a volume
  9. Verify http/https ports are open and PUID and PGUID are set to 1000
  10. Enjoy!

To understand the permissions with FreeNas more watch this video.
Watch this video understand how to setup Rancher.

20200604

Part 2: Ubuntu 20.04 LTS on Lenovo IdeaPad Flex 5 14" 81x20005us

Lenovo IdeaPad Flex 5 14" 81x20005us 

Summary

In the first part of my review I went over the good and bad I found using Ubuntu 20.04 on the Lenovo IdeaPad Flex 5 14" laptop. This laptop a a definite buy and all features of the laptop can be used with Ubuntu 20.04 (and probably any other distro).

I'll provide a quick update on the Good and the Bad list that I want to highlight. Then I'll add some of the steps needed to get the laptop fully working on Ubuntu 20.04.

Follow up

  • Battery life is well over 4 hours with heavy use. 
  • Fan blows out to the rear and under load it isn't noticeable
  • Brightness control works but requires Linux Kernel 5.7*
  • Brightness control keys are probably in need of some tuning but totally functional
  • 16GB RAM (Not Upgradeable)
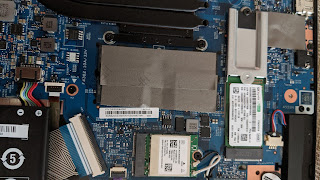
  • NVME SSD 256GB (Single Slot Upgradeable)
  • WiFi Module/Card (Looks like a mini pcie slot and is Upgradeable)
  • Web Camera (works with boltgolt/howdy facial unlock tool but need a well lit area, no IR)
  • Stylus registers as a Wacom HID 5217 device 
  • HDMI port works with External Display (Registered as Device: AMD RENOIR)*
  • Fan can be noisy if you have the laptop in stand mode and under heavy load
  • Sleep is working now with the new Kernel*
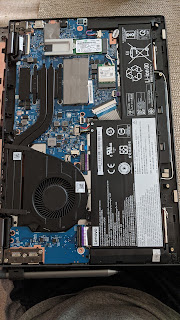
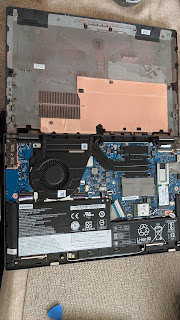
  • More photos below of the Hardware
  • See Instructions for updating the Kernel

Instructions

Installing 5.7 Kernel

Use the mainline tool to update the kernel. Originally described here
  1. sudo apt-add-repository -y ppa:cappelikan/ppa
  2. sudo apt update
  3. sudo apt install mainline
  4. Open up the application mainline and select the 5.7 kernel

In order to boot into this kernel, you will need to set the Laptop to boot "Legacy Mode" because this kernel is not signed yet. 

Installing missing firmware, follow the instructions in this post.
You should be able to use all the features tagged with '*' from the follow up list.

Photos

RAM, NVME Slot, WiFi PCIe Slot

Hardware View

Top and Bottom Inside Shot

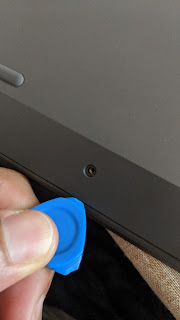
Separate Bottom Cover Carefully

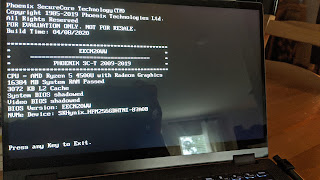
Bios Version


20200603

Ubuntu 20.04 LTS on Lenovo IdeaPad Flex 5 14" 81x20005us

Lenovo IdeaPad Flex 5 14" 81x20005us 

Summary

I'll keep this short, this laptop is a buy.
At the time of this post, it goes for $599 on Amazon

Out of the box almost everything works. After installing Ubuntu 20.04 LTS, everything works except for the HDMI port. I think this has to do with the AMD AGPU and a driver is probably needed. I'll follow up with the fix once I have one if this is a software issue. 

Other than that, this laptop is a buy. I didn't bother booting up into windows. I booted Ubuntu from a USB stick and installed it with secure boot and updated the MOK without issues.

Good

  • USB-C Charging 65W adapter included
  • 2 in 1 
  • Backlit Lenovo Keyboard
  • AMD Ryzen 4500U 6 Core CPU
  • 16GB RAM (Not Upgradeable)
  • NVME SSD 256GB (Upgradeable)
  • TouchScreen works out of the box in Ubuntu 20.04
  • Web Camera (works with boltgolt/howdy facial unlock tool, I don't think it's IR)
  • 2 X USB A 3.0 Ports
  • SD card slot
  • Glossy screen and bright enough for me
  • Comes with Stylus
  • Speakers are loud, good for YouTube Watching
  • Good amount of screen real estate
  • Fans quiet, near silent with Chrome open and playing YouTube in the backgroun
  • Plastic material has a rough feel and grips well to my wrist
  • Bezel around the screen is thin and not noticeable at all
  • Performance is great and 6 cores and 16GB of ram is plenty
  • 2 in 1 functionality works well
  • In Tablet Mode, keyboard and mouse automatically disable


Bad

  • USB C port does not support Video output must use HDMI)
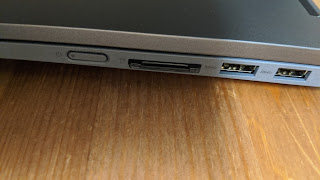
  • SD Card slot is half (maybe 1/4) depth so you need an adapter if you want full time slotted SD card
  • .2lbs Heavier than a surface pro 4 with Keyboard, case, pen
  • Ubuntu Screen brightness not working, screen only turns on or off using brightness control
  • Stylus uses funky usb slot holder, just put the stylus in your bag.
  • Sound doesn't have enough bass
  • The keyboard is a good size but I noticed I my right index reaches a little more than usual for the 'Y' key, this could be due to using a Surface Pro 4 and Macbook 13" (or it's just in my head).
  • Trackpad feels cheap, it's large but the clicking is loud and has a cheap click feel to it
  • Fingerprint reader is a nice touch but it should just be on the power button or someplace above the function keys
  • CPU SMT would have been nice, getting this to 12 threads would make it the ultimate buy
  • Keyboard and trackpad do not disable when in tent or movie stand mode, this is probably an Ubuntu/Linux limitation. 
  • Screen won't rotate when in Tent mode, again probably an Ubuntu/Linux limitation. 
  • Screen does not rotate to portrait mode when converting to tablet mode, again probably an Ubuntu/Linux limitation. 
  • Webcam face detection using Howdy only works in well lit rooms.


Photos


20200123

Arista DCS-7050S-52-R Modding

Arista DCS-7050S-52-R Modding

Background

I've recently purchased two Arista switches a 7124S and 7050s. Best piece of advice, stay away from the 7100 gen1 and gen 2 switches. These are too old and don't support enough modding features. The other issue, especiially with the Gen 1 7100, the DIMM is a special DDR2 format called Mini DIMM. Finding the right DIMM is very difficult and I have spent too much money on DIMMs going that route.

Modding Solutions

The 7050s is by far the cheapest and most mod friendly platform. I was able to upgrade it to 16GB of RAM, 4GB DOM SSD, and I've thrown several different optics towards the SFP+ ports. The swich supports EOS 4.18 and below. If you want support for 4.21 or 4.22 EOS, then you should fork the money over for a 7050QX. The issue with that platform, 40G interfaces. I don't have a need for 40G and I save approximately $400 in my hobby expenses.

Purpose

By not sounding too crazy, this is my hobby. I wanted to have 10G interfaces for my VMWare Lab servers and other switches. Having OpenFlow and potentially docker available on the switch, allows me to expand my dabbling in Network Automation.

Upgrades, Configs, and Mods

Fans and Noise

  • environment fan-speed override 30

Allow SCP copy to the device

  • aaa authorization exec default local

USB DOM

  • Innodisk USB 4GB SSD Hard Drive NAND FLASH MEMORY DOM USB Header

DIMMs

  • Upgraded from 4GB of ECC RAM to 16GB of ECC RAM
    • TriCor TRF7256U64F9333G7-HYBP
  • New RAM
    • 2x8GB PC3-12800R DDR3-1600MHz 1Rx4 Reg ECC Samsung M393B1G70BH0-CK0

Compatible 3rd Party Optics

  • To support 3rd party optics and DACs, create an empty file "enable3px" in /mnt/flash/
    • FINISAR CORP.    FTLX1471D3BCL
    • CISCO-TYCO       1-2053783-2
    • CISCO-TYCO       1-2053783-2
    • US Critical             GLC-T-US
    • Methode Elec.        SP7041-M1-JN1-01
    • OEM OPTIC          E10GSFPLR-OO
    • Intel Corp               FTLX1471D3BCV-I3

Future

SSD

  • There is a SATA connector that appears to allow for a SATA SSD drive to be plugged into it.
  • This would require an right angle connector and some way to secure the SSD drive.
  • Ideas
    • Use a right angle SATA adapter.
    • Use an M2 SATA drive.
    • Secure to the middle frame using some sort of ribbon cable.

ext4 boot

  • I would like to boot using an ext4 formatted partition.
  • Today it appears to only allow vfat with a 2GB partition size limit.
  • Aboot does a dosfscheck at boot everytime.

Aboot

  • Upgrade Aboot and coreboot to allow for more flexibility and maybe features.
  • Need to learn how Aboot is flashed and how to recover from a "mistake."

20180827

Update 2:Pixelbook and Everyday Use


Pixelbook and the Home Admin Network

Today I have marked the 10th day with my new Pixelbook. I am already feeling some of the limitations when it comes to my home network and when it involves Network Attached Storage systems (NAS). Below is breakdown of some basic Home Admin Network tasks and what I do to complete these on a Pixelbook.


Drobo 5N

The summary here is to not bother with purchasing a Drobo if you are going to be a full time Pixelbook user. Don't bother considering any of the Drobo direct attach solutions. You need the Drobo application to start configuring it and to create shares for your network. That application is supported only on Windows or Mac OS. There isn't a Linux application and there isn't a Web interface for it. So do yourself the favor and don't bother with a Drobo.
I can still work with a Drobo since I have other computers I can use to manage it but what's the point? There are better solutions out there for the same price but probably don't look as good. Drobo's are designed well and do not take up a whole lot of desktop space. These devices are quiet, reliable, and easy to use. The only downside is the lack of admin controls apart from the Windows and Mac only applications. Sorry Drobo but it's been years now, you should have a solution for users who don't have a Windows or Mac systems.

Synology DS916+

This is going to sound like a sales pitch, because this is hands down the best solution for any Pixelbook power user. With this one NAS you can reach the following from the Pixelbook running ChromeOS:
  1. Everything running on DiskStation Manager Desktop (DSM).
This means you can run docker containers, VM clients, VPN clients, Administer the Volumes, Administer the entire system. Having the DSM run as of a web application and allowing for the entire system to be accessed from there is a great tool for any Pixelbook user.

Troubleshooting Home Networks

I chose my words carefully for this subheading, because there is a huge difference between enterprise networks and home networks. Sometimes the difference is just hardware and other times it is the way the hardware must be accessed in order to configure it. Home Network devices such as routers, switches, firewalls, and wireless access points mostly all have a web interface to access and configure these devices. So using a Pixelbook is not a problem. 
Even troubleshooting at the console level is possible. The Pixelbook recognizes USB to Serial adapters and you can use the Chrome Extensions Serial Term in order to establish a serial console connection to a device. Even Ubiquiti has an extension to reach devices on the network. There android apps for pings, few options for port scanning, and Proxy extensions can really help identify Firewall issues. Overall, it isn't at all impossible to troubleshoot home networks.

Encryption

To put it in simple words, the Pixelbook in terms of external drive encryption lacks all the ability to try and protect oneself from a lost drive. Totally disappointing and they shouldn't allow for this go on further. Encrypting one's storage is about personal privacy beyond the device. 

Summary

A Synology NAS and some Chrome extensions later, we can have a working environment in minutes. The NAS would allow us to focus on the most important work we have and feel confident that the Pixelbook will have access to data stored in a reliable solution.